English
 Español
 Deutsch
 日本語
日本語 Polska
 Français
 中國
中國 한국의
한국의 Українська
 Italiano
 Nederlands
 Türkçe
 Português
 Bahasa Indonesia
 Русский
 हिंदी
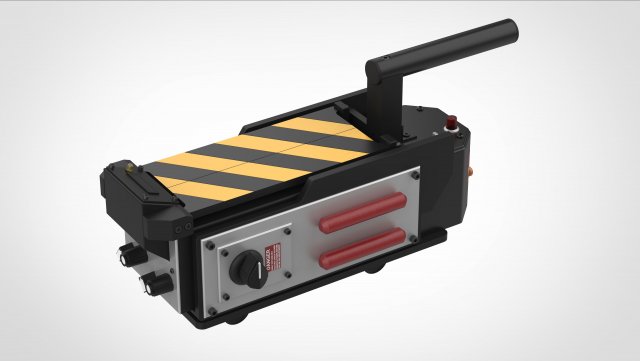
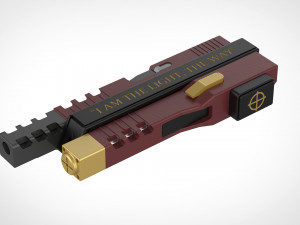
हिंदीHayalet Avcıları 1984 filminden hayalet tuzağı 3D Baskı Modeli


CYBER MONDAY
SALE 50% OFF
$
15.00 USD
- Yazardan ürün desteği talep edin

- Hazır formatlar:
- Ürün ID:427783
- Tarih: 2022-12-19
- Koleksiyon:
- Genişlik (cm):35,2
- Genişlik (in):14
- Genişlik (mm):352
- Yükseklik (mm):150
- Derinlik (mm):170
- Baskıya Hazır:
- 3D Tarama:No
- Yetişkin(+18) içerik:No
- PBR:No
- Görüntülemeler:5268
Açıklama
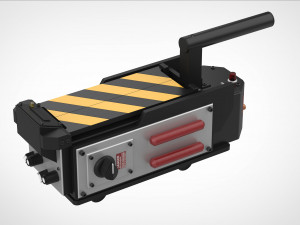
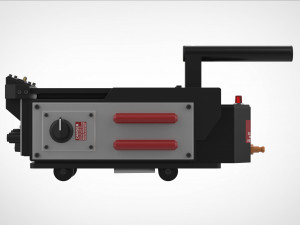
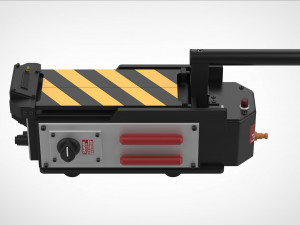
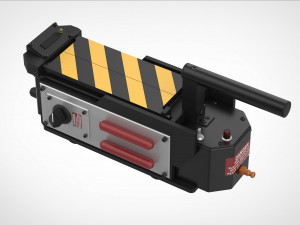
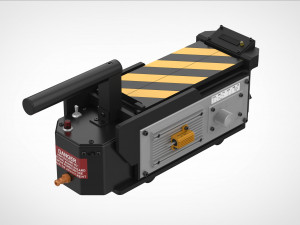
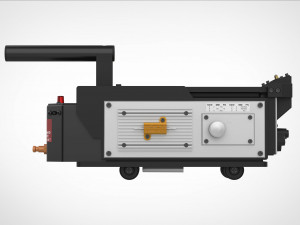
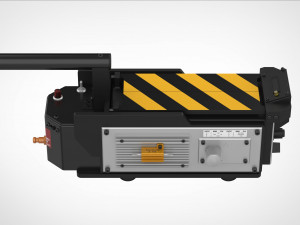
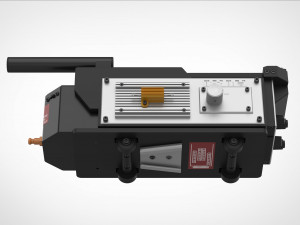
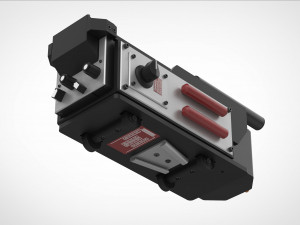
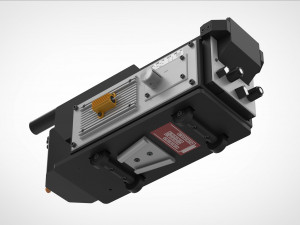
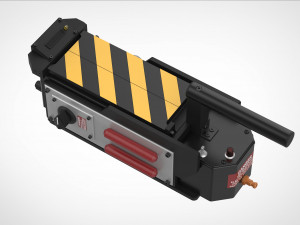
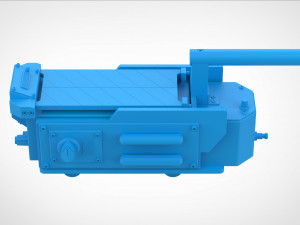
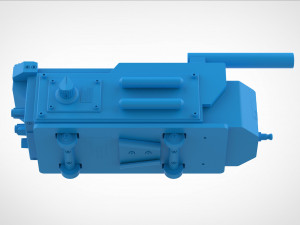
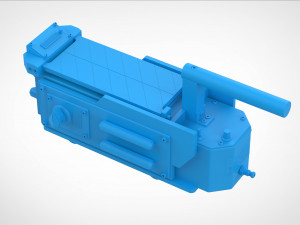
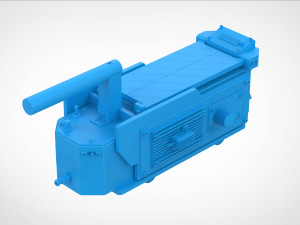
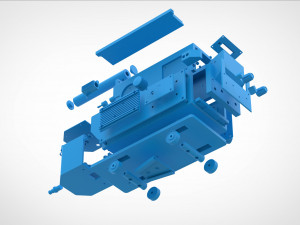
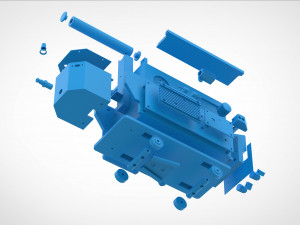
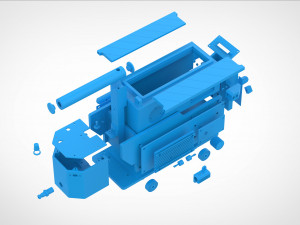
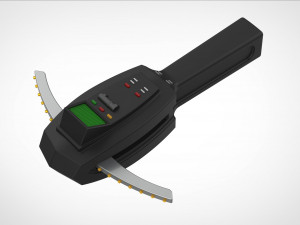
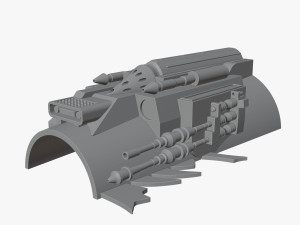
A piece of ghostbusting equipment almost as important as the proton pack in the Ghostbusters universe, the ghost trap was used for detaining and transporting "busted" ghosts until they could be safely stuffed into the Ecto Containment Unit. Believed by some to entrap the ghost with a laser containment field, precisely how the trap works was never fully explained in the films.The trap consists of a spirit canister and a trap trey. The yellow-striped canister doors slam shut and seal the spirit inside.
Also on the trap we can see power adjustment knob, electro-magnet heatsink, battery pack, valence indicator, activation switch, polarization adjustment knob, canister doors, activation light.
The model was created from photographs of the props used in the film. All parts have been worked out in detail for assembly with screws with the ability to open doors and remove the canister.
The dimensions of the trap correspond to the original dimensions of the trap from the Ghostbusters movie.
Tips for using screws for assembly:
FRONT PARTS
-Screw #6x1/8" socket head screws into wings.
-Screw bargraph plate to top unit whit #4x3/16" socket head screws.
-Attach knobs with #4x3/8" socket head screws.
-Screw plate to trap with #4x3/16" button head or #4x 3/16" socket head screws.
DOORS PARTS
-Use #6x1/2" socket head screws to attach rear of doors to supports.
Do not tighten fully so that the doors can still move.
BOTTOM PLATE PARTS
-Screw wheels to axles using black #10x3/4" flat head wood screws
-Screw axle assemblies to bottom frame with #6x5/16" socket head screws.
REAR BOX PARTS
-Screw rear box to trap frame using #4x3/8" socket head screws through top tabs and bottom holes.
- Screw #4x3/16" button head screws into rear cover plate- simply go through the plate,don't try to screw it to anything.
-The base of LED cover can be painted silver. Glue it and the toggle switch to rear plate.
RIGHT SIDE PANEL PARTS
-Traps used 4 regular socket head screws. Make sure a #6 screw will pass through the 4 outer holes of the side plate freely.
-Place the large plate on side panel and screw on vector plate with #4x3/8" socket head screws.
-Screw on resistor with #4x5/8" socket head screws.
- Instal the small plate next and screw in right side of small plate with #4x3/8" socket head screws,make sure the left side holes line up with large plate.
- Instal knurled knob with knobs side post. It can be glued in place or a #4x1/8" set screw can be used.
LEFT SIDE PANEL PARTS
-Place the large plate on side panel and attach side red rods with #4x5/8" socket head screws
-Place smal aliminium plate on large and screw left side in with #4x 3/8" socket head screws.
-Instal knurled knob with knob side post. It can be glued in place or a #4x1/8" set screw can be used.
HANDLE
-Glue end caps on handle.
-Screw handle to frame with #8x1.25" socket head screw.
-Screw handle part2 to trap frame using #4x3/8" socket head screws.
The above describes the screws that were used in the original props, I think.
The model is easy to print. The details of the model are designed so that they can be printed on printers with a small print area.
Also, I took into account the possibility of printing individual parts with colored plastics, in colors that match the colors of the original parts.
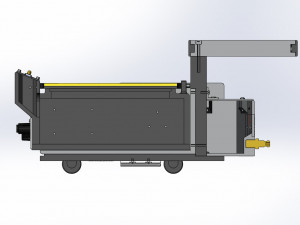
Attached is a diagram of the assembled view. On it you can easily assemble it.
It will take its rightful place in your collection or complement your cosplay look.
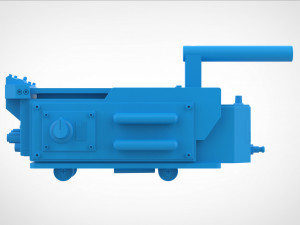
Model dimensions:
- length – 352 mm
- height – 166 mm
- width – 148 mm
The model consists of:
Ghost trap divided into 47 parts for printing;
Separately, taking into account printing on printers with a small print area. But you can split it yourself as you need. The model file is attached in one piece.
Formats: .OBJ .STL .SAT .STEP .XB .XT .IGS .SLDPRT
Useful links:
https://www.gbfans.com/wiki/Category:Ghost_Trap
https://propstore.com/product/ghostbusters-1984/radio-controlled-hero-ghost-trap-and-pedal/
Designed in Solid Works 2012, rendered in Keyshot 10.
Daha fazla formata mı ihtiyaç duyuyorsunuz?
Farklı bir formata ihtiyaç duyuyorsanız lütfen destek ekibimize bir talep açarak ihtiyacınızı belirtiniz. 3D modelleri şu formatlara dönüştürebiliriz: .stl, .c4d, .obj, .fbx, .ma/.mb, .3ds, .3dm, .dxf/.dwg, .max. .blend, .skp, .glb. Serbest Format Dönüştürme3d sahneleri dönüştürmüyoruz ve .step, .iges, .stp, .sldprt gibi formatlar.!
Kullanım Bilgileri
Hayalet Avcıları 1984 filminden hayalet tuzağı - Telifsiz bu 3D modeli, Temel veya Genişletilmiş Lisans uyarınca hem kişisel hem de ticari amaçlarla kullanabilirsiniz.Temel Lisans, dijital reklamlar, tasarım ve görselleştirme projeleri, ticari sosyal medya hesapları, yerel uygulamalar, web uygulamaları, video oyunları ve fiziksel veya dijital son ürünler (hem ücretsiz hem de satılan) dahil olmak üzere çoğu standart kullanım durumunu kapsar.
Genişletilmiş Lisans, Temel Lisans kapsamında verilen tüm hakları, kullanım sınırlaması olmaksızın içerir ve 3D modelin Telifsiz koşullar altında sınırsız ticari projede kullanılmasına olanak tanır.
Daha fazla oku
Para İade Garantisi sağlıyor musunuz?
Evet, sağlıyoruz. Bir ürün satın aldığınızda çözünürlükte ya da tanımda bir hata bulduğunuzda problemi en kısa sürede çözmeye çalışacağız. Hatayı düzeltemezsek siparişinizi iptal edeceğiz ve sipariş tarihiniz göz önünde bulundurularak paranız size 24 saat içinde iade edilecektir. Daha fazla detay için tıklayınızAnahtar Kelimeler
Tasarımcıdan rastgele ürünler
-50%
bip max obj sat sldprt step stl stl x
Vetrock
Other
-50%
bip max sat sldprt step stl x x
Vetrock
Other
-50%
bip max sat sldprt step stl x x
Vetrock
Other
-50%
png max sat sldprt step stl x x
Vetrock
Other
-50%
stl
Vetrock
Other
-50%
bip max obj sat sldprt step stl stl x
Vetrock
Other
-50%
bip max stl max sat
Vetrock
Other
-50%
iges obj sat sldprt step stl stl x x
Vetrock
Other
-50%
ma ma ma ma ma ma ma ma ma
Vetrock
Other
-50%

max max bip max max sat sldprt step step
Vetrock
Other
Bu ürün için yorum bulunmamaktadır.
-50%
stl
FenixArts
Other
-50%
bip max obj sat sldprt step stl x x
Vetrock
Other
-50%
x dwg fbx iges max obj stl
Dufe
Other
-50%
stl obj stl obj stl obj
Dzusto
Other
-50%
3dprintmodel91
Other